Blog

Tutorials, Uncategorized

Valentine’s Day Decor and Some Tutorials

I chose to decorate for a holiday you typically don’t

I mean, really. Who goes all out for Valentine’s day? Bloggers. I’ve never decorated for it before, but I want to learn to accept, and love, all holidays. Plus, I grew used to having the warm white lights on my mantle and I’m working to convince the villain that I need them, all the time! He likes the soft glow, so it should be an easy battle.

20180128_200351

I LOVE how my mantle came out! Believe it or not, it took me way longer to put together than I care to admit. I was so torn over colors. Something so simple, and I couldn’t get it together. I’ll show you how I made the grapevine wreath(not this one, but the one I used before changing my mind), the “love” round sign, the string balls inside of the my “Apothecary” jars, and give you some ideas so you don’t have to spend two weeks deciding on colors.

I really didn’t want to do the traditional red, black, and white. The key piece that pushed me towards more pink, white, and gold is that centerpiece, round wooden sign. I loved how it came out so much that I based the rest of the decor off of it. The chalk paint, “ballet slippers”, is a perfect match to Victoria’s Secret pink, just as a tip. I spent just under $20 on everything, and a lot of it is reusable. This truly is a budget mantle! The majority of my budget went towards the faux roses that I used in the ceramic vase and two wreaths. Everything was purchased either at Dollar Tree or online at Hobby Lobby, including the supplies needed for all of the items I made.

I started with the tinsel garland and wrapped the lights around it. I made the sign out of “large plywood circles” from HB. I already had the vase, candles, ribbons, candle jars, and the birdcage was purchased second-hand from an old high school friend that used them in her wedding. My Dollar Tree is really small, and the variety leaves much to the imagination, so I found the candlesticks online and bought a whole case of them. The reused candle jars were filled with string balls and Styrofoam hearts.

20180125_175156

I didn’t take any pictures of the process because it’s pretty self-explanatory. You just get some balloons and lightly inflate into a small circle. I used a few shades of pink embroidery floss and Mod Podge and saturated the balloons, wrapping the floss around them. Once they are entirely dry, pop and remove the balloon. You’re going to have dried Mod Podge in the gaps. I saw that other tutorials didn’t mention this, so you didn’t do anything wrong. Just use some scissors to cut it away, or accept them. No one is going to notice but you anyways. They’re going to be really soft, you can see that mine are squished inside the jar.

DIY LOVE Sign

Super easy DIY! Two coats of white chalk paint, painter’s tape evenly spaced, followed by two coats of the “ballet slippers” pink chalk paint, dry, add “love” using either a stencil, hand painting, or using a vinyl cutting machine. Done! Remember to sand before painting, and after each coat!

Floral Wreath DIY

20180125_175358

Start with deciding on a color scheme and pick up everything you’re going to need.

  • Heart shaped grapevine wreath
  • Faux florals, 2 stems
  • Hot Glue Gun/glue
  • Ribbons
  • Wire Cutters

Once you have everything you need, refer back to my last post about making a three-tier/triple stack bow with tails. You’re going to want a large bow, so use the same steps but use longer lengths of ribbons. I used several colors and mixed textures like satin and grosgrain ribbon. I listed that you would need at least 2 stems of flowers, but I only used about 1.5. Use the wire cutters to cut the buds off, only if you’re using the leaves. The other buds, you can simply pop right off. Plan out the placement beforehand, and once you’re happy with the look, glue them all in place. The bow will be too heavy to glue on, so you’ll need to use a skinny piece of ribbon to tie it around the back. You can use glue on the back as a security tack. Add another piece of skinny ribbon to the top center v of the heart, tucking it underneath one of the vines that hold the two pieces together for hanging. Easy peasy, right?!

Decorating for a holiday that is typically overlooked isn’t easy. It’s more of a mind over matter type thing. Once I made the decision to go for it, and settled on a plan, the rest fell into place easily. I’m happy with my purchases, I know that I can reuse them in the future and in different ways and I’m even more happy that I went way out of my comfort zone and decorated for a holiday that is normally is overlooked.

With any holiday or season, remember that your decor is for you. Make it a representation of yourself and have fun with it. If it’s not fun, if it doesn’t bring you joy, then skip it. It’s your life, your home. You’re not hustling for a TV show, so do what makes you happy!


Like it? Love it? Want to come back to it? Pin it!

Tutorials, Uncategorized

DIY Disney Themed Hair Bows, Two Styles

Oh, the wonderful world of Disney! So many iconic characters, memorable titles, classic favorites, and loads of inspiration. Big bows are the “it” thing right now among young girls. So, today I’m going to show you how to make the “Loop-De-Loop”, “Classic”, and “Tiered Bow”, along with some variations. I’m also going to introduce you to my favorite bow making tool, which will take your bow making skills to a whole new level. The two bows that I’m going to show you are all variants to their respected titles and are classic Disney and Ariel themed. Ready? Here we go!

Supplies:

20180113_200703

  • Ribbon of various widths/texture
  • Ruler or tape measure
  • Hot Glue gun
  • 2″ Barrettes
  • Needle, thread, scissors
  • Clear rubber band
  • Lighter or Fray Check
  • “The Ribbon Boutique” bow making tool (optional, could use a clothespin or sewing pin)
  • Appliques (optional)

Bow Holder Tool

I purchased this handy little tool at Hobby Lobby several years ago. It really does help with making bows. It comes with 3 clips, and has printed instructions on how to make a basic double loop bow. For $2.99, you can’t help but have these in your craft supply stash!

20180113_202046

Ariel Inspired


The Ariel bow is a combination of the “Loop-De-Loop”, and “Classic”. The classic bow is basically a bow tie, so you can use the same technique to make those as well.

First, gather your supplies and have everything ready to go. I used three different ribbons, the blue is 1.5″ wide, purple grosgrain is 5/8″, and the green is 3/8″. Measure and cut the primary ribbon (blue) 25″ long. Lay the ribbon with the pattern side facing down. Fold the ribbon in half to find the exact center, making a crease, and fold one end in, with the bottom corner of the edge on the bottom of the crease, so at an angle. Repeat for the other end, overlapping the other end a tiny bit. When folding the ends towards the center be sure that the pattern side is facing outward. You should now have a figure 8, infinity looking piece of ribbon. Use a pin, or the bow making tool to hold the ends in place.


Now, thread your needle with thread, you don’t have to use a matching color, it won’t be visible in the final product, so you can use whatever you have on hand. Knot the thread and make a running stitch through the center of the bow holder, being careful not to get the thread wrapped around the clip. A running stitch is a basic straight line, spaced out, so you will only need to make 3-4 stitches. This is what your ribbon should now look like.


Now, tuck in each loop to the center, the stitching, and use the clip to hold them in place.


Take a length of thread or embroidery floss, and insert through the clip, as shown in the second photo. You may also us a clear rubber band. Pull the thread/string very tight, bring careful not to break it. Wrap the thread around the center a few times to create a better “pinch” and tie into a knot to secure. Trim away any excess. You could stop here if you’d like, by tying a 1/8″ wide ribbon into a french knot (instructions shown in next bow) around the center and adding a clip or attaching to an elastic band.

20180113_190736

That is a basic “Loop-de-Loop” bow. We’re not stopping here though. We are going to make a variation, adding tails and another a layer, typically called a”double stack”. Let’s start with the next layer, the “classic” bow! The classic is very simple and can be used on its own as a bow tie for young boys, or bigger boys by using a wider, and longer piece of ribbon. Add some interest to your classic bow by using a different colored piece of ribbon for the french knot!

Classic Bow

To make a classic bow, cut two pieces of coordinating, or the same ribbon. Cut one piece 9″ long, and the other 2″. You can use either Fray Check, a sealant, or a simple lighter, or any flame for that matter, to melt the ends of the ribbon to prevent fraying. Like always, use caution when playing with fire, and don’t hold it too close, or too long. All you want is to see a slight melting of the ribbon ends. If you over do it and have black spots, or REALLY overdo it and have clear, bubbly ends, simply trim, and try again. It’s really easy to do, but everyone makes mistakes. Luckily, this one has a quick fix.


Take the 9″ piece of ribbon, and fold both ends to the center, slightly overlapping. Place the bow holder tool, or a pin, over the ribbon to hold placement. Again, make a running stitch through the center to secure ends. Gently pull the thread to gather the ribbon center. I ended up using a different ribbon for the center of my bow, green, but the instructions are the same. I just had to use a 5″ length of ribbon because I was wrapping it around both the purple, and the main blue glitter ribbon. You take the short, 2″ piece and wrap it around the center, bringing the ends to the back. Use a few stitches to secure the small center ribbon to the main bow, and cut off the excess. I’m layering my classic onto a larger bow, so after I cut off the excess I stitched it in place, through all layers of ribbon. You could also use a small drop of glue from your hot glue gun. That’s it, that’s all there is to a classic bow! Easy peasy, right?


How to Add Tails to Your Bows (Optional)

We’re almost done! Let’s add some tails. I cut 2 pieces of my primary ribbon, roughly 5″ long, and layered them into a V shape. Quick tip: fold the tails in half lengthwise (hotdog) to find the center. I do this to make the V cut out at the ends even. I place my top layer over top of the tails to determine how/where I want them to look.  Once I find the spot that looks the best to me, which is usually a half inch or more from the top of the ^ shape. Sew through all layers. I usually try to keep my stitches in the back layers, so they’re not visible in the front. Cut the extra at the top off, if you have any. Cut out the bottom ^ shape of the tails. Melt ends or use Fray Check. I didn’t have to do either because I used wired ribbon. DISCLAIMER: Wired ribbon isn’t the best choice for bows, but sometimes you have to use what you can get.


Attaching Bow to a Barrette (Optional)

And that’s my variation of a double stacked bow with tails. It’s so cute, right? What’s the point of it being so cute if it’s unusable? We’re going to add this to a basic 2″ barrette. You normally get about 5 in a package for less than $2, so you can play around and make your own variations for you, or your daughter, to wear. Remember that 2″ piece of purple grosgrain ribbon I cut for the center of the Classsic bow? I’m going to use it to cover the barrette. If you used that piece, all you do is cut a 2″ length of ribbon, or if you’re using a longer barrette, cut a piece the same length. Because I’m using a piece of 5/8″ wide ribbon, I folded it in half lengthwise and used a few drops of hot glue to secure. I ran a line of hot glue along the top of the barrette and put the ribbon over top. This creates a barrier between the bow and your hair, which is a good thing, because you don’t want to rip any of your hair when you take the bow out, plus, it is aesthetically more pleasing to the eye.


Minnie Mouse Tiered Bow

Now for my favorite, but tricky, type of bow; the Triple Stack, or Three-Tiered Bow. This bow uses a lot of ribbon, and I’m going to show you a variation of it. It’s typically done in this order: 2 loops (classic bow, no center), 4 loops of the same ribbon as the bottom, 6 loops of a thinner ribbon for the top, tails, and a french knot in the center.

20180113_201919

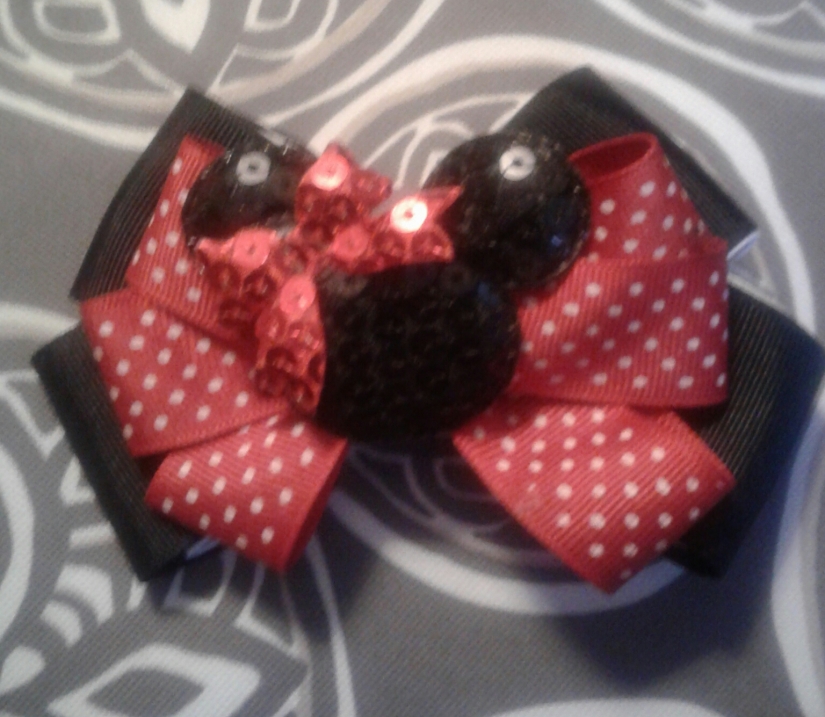
I’m calling my variation a Triple Stack, even though there’s only 2 layers of ribbon. The top layer is the mouse applique. Here is where I will show you how to make the french knot for the first bow we talked about, the “Loop-de-Loop”.

Gather your supplies again, same tools as before, just different ribbons. I used wide, 1.5″, lengths of black and white grosgrain for the bottom layer. I cut both colors into 20″ long pieces and melted all of the ends with my lighter. I laid the black on top of the white, just for dimension. I folded them like the classic, but in quarters, to create 4 total loops. Fold one end in a quarter of the length, making the first loop, wrapped it back around, making 2 loops on one side. I then wrapped the ribbon to the other side, making another 2 loops; this gave me 2 loops on both sides for a total of 4 loops. Use the bow tool to hold the loops in place, making sure the ends are tucked inside at the center of the loops. I used a clear rubber band to secure the base. I cut the thinner piece of the red/white polka dot ribbon into a 25″ length, again melting the ends to prevent fraying. I wrapped it the same way, just with 3 loops on each side, for a total of 6 loops.


Again, using the bow holder tool to hold the 6 loops in place, I threaded my needle and used a quick running stitch to secure it. I stacked the two bows and used the rest of the thread to stitch them together. I wrapped the thread around the center of both bows and tied it into a knot in the back.

20180113_202904

How to Tie a French Knot

I’ve mentioned the french knot several times. You can use it as the center for all of your bows. You don’t need to use the same ribbon, though. By using a narrower, different colored or textured ribbon, adds dimension and another layer of interest to your bows. In this case, I used the same polka dot ribbon as I used for my 6 loops. Cut your ribbon into a 10″ long strand. Loop it like an awareness ribbon. Tuck one end through the loop and gently pull. Rotate the ends closest to the knot so that the printed side is all that is visible and the knot is smooth. Wrap around bow(s) and either stitch or glue to secure. Trim excess, and use either Fray Check or a flame to prevent fraying.


I didn’t add any tails to this bow, but you can by using the same method described in the Ariel themed bow. I did, however, add another layer of interest by adding a padded Mickey Mouse head shaped, sequined, applique. I wanted it to channel Minney Mouse, so I used a drop of hot glue to add another padded, sequined, bow shaped applique to one side. I think it’s just so adorable! I tied my french knot, added a barrette, using the same method above, and glued the Mouse head to the center. Included are photos of the bow with, and without, tails.


Like it, love it, want to come back to it? Pin it!

If you have any questions, need help making even loops, have any requests, or want to share the bows you’ve made with my instructions; leave a comment and I will happily help you out!

Christmas, Uncategorized

Transitioning Your Christmas Decor to Winter

Now that the holidays have passed, what do you do with your decor?

Here’s a quick few photos to remind you of my holiday decor. I’ll walk you through the steps I used to transition my decor to something less festive, and more winter themed.

Use What You Already Have

26173201_1549099085137584_7162755739823457985_o

The transition from festive to winter wonderland is something a lot of people struggle with each year. I simply moved a few things around, packed some of the very Christmas items, and added a few small things. I put away the tree, packed up the Santa’s and wreaths, and my handmade signs. Since my mantle is always my decor focal point, let’s start there. I removed the sign, ornaments, knick knacks, wreath made of garland, and the mini tree. I loved the look of having something hanging in the front center of my mirror, so I placed the family initial there. The one I have was a gift from a friend, I’m not sure where she found it, but I love it. The marble looking background is my favorite. You can easily recreate something similar with a wooden letter from Wal-Mart or any craft store. Paint it, attach a piece of ribbon, and you have one of your very own! I left the lights because I enjoy the ambiance they create.

Move Things Around

26171579_1549099518470874_685979441757004564_o

Now that I have the items that I don’t want to use out of the way, I’m going to move the items that I have had scattered throughout the house. Starting from left to right, here’s my new mantle. My signature spider plant, a small winter village(I used these for my Christmas decor, but they were on the windowsill behind the TV. You could only see them from the outside, which is very easy to do),  and the up-cycled Apothecary styled candle jars that were on my table? Well they got a small update. I literally just added a new candle and put one on either side of the mirror. I added another set of silver candle holders after I took the photos.They were another after Christmas special, costing me less than $1 for a pack of two! Now we’re back to the center. underneath the mirror initial, I added my pot of free poinsettias. The added color was seriously needed.

Use Colors

20180109_223843

I kept the red candles, poinsettias, and beautiful up-cycled “vase”, just for the added pop of red. Winter decor doesn’t have to just be white with greenery. Play around with silver, gold, red, black, and grey. Those are my top color choices, but you use what you love. This is your design, not mine! I kept the different lengths of silver glitter ornaments in the large window. Once the pine garland was removed the large window felt empty to me. So I took the easy way out and draped a strand of fairy lights with the curtain swag. My kitchen still has the red and white table, but I packed up the very Christmas looking candle set and replaced it with a grey “Mini Catch all Bin” from Thirty-One. I added some faux floral picks to stick out the side and hid a small mason jar of pens in the center. It still needs to be functional!

Smaller Vignettes for a Cozy Feel

20171229_084542

Creating smaller vignettes and focal points are key. Winter decor should feel warm, not cold like the temperature! I have my snow village, which I used a foam board sign, that I had previously made, as the background. I did this to give it a winter-esque appearance, and to set it apart from the rest of the decor; creating a smaller vignette. Keeping the tall silver vase gave me the tall focal point that I needed. Another place to create a cozier feel is your couch! Get yourself a nice sheepa blanket, in either grey or white, and drape it along the back of the sofa. Get a few extra throw pillows that coordinate with your blanket for a warm, welcoming spot.

For my porch vignette, I didn’t change much. I just packed up the tree and moved the sleigh to the other side of the door. Moving the sleigh focused your eyes towards the door, and not just to one side of it.

20171208_163105

Plan for Next Year

I’ve already started picking up items for next year. I learned quite a bit this year and feel more inspired than ever before. I don’t want to use the same design, year after year, and I like having options. Doing this also gives you more items to think about when it’s time to decorate. This is a callback to my previous tip of using what you already have in different ways. I can assure you that my home will not look the same as it did this year, so why would I keep using the samedecor? This doesn’t mean that you need to spend a fortune every year on new decor. Focus on large purchases, if you need to, but make it a point to pick up one, or two, small items.

26171277_1549099665137526_8218457254058385095_o

One last quick tip: head out to the store soon and pick up a few small terracotta pots and either herbs, or floral seeds. Spring is coming and you’re going to want some fresh plants! I use a lot of greenery in my decor because of how versatile plants can be. They’re also great for the air, and who doesn’t love pretty flowers?!

Like it, love it, want to come back to it? Be sure to pin your favorite image!
Christmas, Uncategorized

My Holiday Porch Vignette

What is a Vignette?

I use the term “vignette” quite frequently, if you haven’t noticed already. It’s just a fancy term for a planned decor layout. Remember making shadow boxes and dioramas out of cereal boxes as a kid? You were putting together a vignette! This was but only my first year at really putting up holiday decorations, and I wanted to take full advantage of it. My front porch/deck is awkward, to say the least. When you’re driving down the road towards my house, the first thing you’ll notice is the driveway, followed by an attached garage with a concrete slab that sticks way out past the house. You can’t even see my front stairs and door until you’ve driven past my house. Sorry delivery drivers! It’s almost pointless to create a vignette near my door. I live at the bottom of my dead end street, you can’t really see it from the road, and it’s awkwardly shaped. Regardless, I wanted to embrace the season and go all out with my decor.

Key Pieces

My porch decor came together slowly. In fact, the final piece wasn’t even in place until December 23rd! I knew I wanted the staples; lights and mini trees. There’s a lot going on, and every time you look at it you’ll notice something new, and I love that. The total amount of money spent on my awkwardly shaped, outdoor vignette was $12.50. I had pretty much everything already, except for a mini tree. I scored this one for only $10, brand new. It came prelit, with twigs, berries, and pinecone decorations. I used one of my budget tips in my last post; shop in November.

To create a great porch vignette, you need focal points and key pieces. In my case, every item could have been its own key piece. It was actually a bit of a challenge to make them look cohesive. The villain brought me home some amazing furniture pieces just as I was starting  to plan my design. One of them was the super cute, white rocking chair. Unfortunately, it has a veneer seat, so it’s not really meant to be outdoors. I placed it closest to the door to protect it as much as possible from the Pennsylvania winter conditions. The fabric draped on the side is from my massive fabric stash. It’s an apparel cotton and reminds me of my grandpa. The sign was added much later on. I had made it for a craft fair and it didn’t sell, so I figured I’d toss it into the mix. It is a really thick piece of flooring tile, hand painted, with twine wrapped around both side edges(I tried to give it a religious, nativity like feel). To keep the chair in decent condition I use a mini broom to brush the snow off and keep as much moisture from soaking through as possible.

20171208_163105

Details Matter

Next to the chair I have the standard craft store wooden crate. I used my signature, special, staining technique on it, added a few pieces of the villain’s fire wood (before he had the chance to chop it up), some pine branches from the driveway tree, and a tall lantern that was given to me. I love lanterns, if you don’t have one, get one. They are incredibly versatile. I filled it up with some Dollar Tree ornaments and a couple of the extra cinnamon pinecones I had left over from the inside decorations. The pinecones weren’t necessary, but I wanted the lantern to look full so they were just a filler.

20180109_134539

Make it Your Own. Literally.

Now, onto my favorite item- the vintage styled running sled. I made it entirely myself. *pats myself on the back* You’ll never guess how I did it, it’s a good thing I plan on writing a tutorial for you! I used pallet wood, a strip of fabric for the reins, and a door knocker from a dollar store for the accent piece. I love it so much! When you see it by the 4′ tree I purchased you can really notice its size. Certainly not one you would find in any store. I put up the tree and was content. But it was missing something, right? Lights! I took the easy way out on those. I reused a set of curtain lights from the wedding. If you’re unfamiliar with curtain lights, let me get you up to date. They’re great for backdrops, large double glass doors, or you can use them to create a starry sky effect along your ceiling or between trees or buildings. The standard size is roughly 10’x10′. There’s one main line that runs across the top, about 10′ long. Every few inches there’s another 10′ strand of lights that hang down. They are beautiful and  so easy to work with. The ones that I have has 8 different light settings, and are warm white LEDs. All I did was hang the main line on some existing hooks that went along the length of my porch roof/ceiling, unwrapped each strand and just let them hang down. I used one strand to discreetly secure my mini tree to the rails behind it and tucked the ends of two strands into the lantern. I did have to take some ornaments out and move things around a little bit so the lights were visible from every glass pane of the lantern, but it made it so you could see some sparkle, if you were lucky enough to actually see my porch lol!

Like it, love it, want to come back to it? Remember to share, Pin, or bookmark!

Uncategorized

Holiday Decor on a Budget

Christmas. It can be such a stressful time of year. Gifts, shopping, debt, baking, and decorating. It’s also an expensive time. So how do you create the joyous, festive, jolly mood in your home with one income, and different opinions on how to decorate? It’s actually pretty simple!

You’ll have to forgive my photography skills. I’m new to this, but I promise they will get better!

The “villain”, aka my husband, thinks Christmas is all about sentimental ornaments and red and green decorations. I, on the other hand imagine a chic, upscale, winter wonderland. Full of white, silver, glitter, and a few traditional touches. I was able to meet him halfway, without spending more than a few bucks.

Use What You Have In New Ways

20171223_193028

The trick to it all was looking at things in a different way, and one of my favorite places; Dollar Tree! For my mantle, which is usually my focal point for all holiday decor, was given a face lift with a gold satin table runner. I just used the one I had from my wedding, that’s another story for another day. I have a rather large mirror that I purchased from Home Depot several years ago that was finally opened and placed only a year ago. Hey, when you find a good deal on something that you love, even if you’re not going to use it immediately, snag it up! I paid $20 for this beautiful, oil rubbed bronze, bevel framed mirror. I like warm white lights and the villain likes cool white or colored. I know, yuck. So I framed the mirror in cool white and used warm white lights for the base. The mirror was still missing something. So I bought a $1 strand of “pine garland” from DT. Instead of unwrapping it, I left it as it was, uhm, hello perfect sized wreath! I added a thick piece of red satin ribbon to the top, used a glue gun to seal it, and used plain Scotch tape to attach it to the back of the mirror.

20171130_203612

Love Thy Dollar Tree

Above the mirror there are several nails in the stone. I used it to my advantage and rested a distressed, hand painted sleigh ride sign on top of them. I made the sign myself so our total is still at $1, that’s if you already have lights and scrap ribbon. In front of the mirror I put a small wooden box, painted grey, added 2 red DT candles, and a large bottle brush tree. I then placed a “hand me down”, older than me, tree on one side of the mirror. I did however add lights to it and wrapped the base in a small piece of burlap, secured with a clear rubber band. You can totally incorporate the burlap base to your full sized tree. It’s a great way to add a rustic, farmhouse touch. Tree bases were very popular this year; whether it was burlap, printed fabric, or a galvanized steel band, a stand wrap definitely replaced the traditional tree skirt.

Shop for New Pieces in November

Our total is now about $7. If you’re wanting to buy yourself some new holiday decor, do it in November! By the end of November, Christmas decorations have already been on the shelf for over a month, and you get to look forward to Black Friday, Small Business Saturday, Cyber Monday, and typical weekly sales. This is the time to stock up on new pieces for this year. If you’re satisfied with what you already have, then the day after Christmas is the BEST day to replace large purchases like indoor and outdoor trees, wreaths, and gift wrap. I recommend going shopping December 26th every year. Trends change, your style and likes will too. What harm is it to buy another tree skirt and tablecloth? Smaller details like those can change the entire feel of your decor, and it doesn’t hurt to have choices!

FB_IMG_1514077222065

Create Large Focal Points

24955432_1531036143610545_954673916837073495_o

20171209_171707

On the other side of the mirror I needed another large piece to create a visually pleasing balance. This was another quick project I whipped up, that I’m kicking myself in the rear for not taking “before” photos. The tall silver “vase” was actually an old champagne ice bucket. It had the worst white, chalk paint finish, full of brush strokes and black raised flowers on either side. It obviously had potential. I taped the nice wooden handles with Frog Tape (the BEST painters tape) and used a silver spray paint for the base color. Once it was dry I used my favorite spray paint, Rustoleum’s Oil Rubbed Bronze, and sprayed it in random spots all over the bucket. While the paint was still wet, I used a dry cloth to wipe it away, leaving faint darker spots. Now, it looks like an aged galvanized vase! I have these trees the whole length of my driveway, I don’t know what they are but they have long droopy branches that look just like a pine tree. I used some shears and cut several branches. I tucked them into the vase, along with some $1 red and white floral picks from DT. I also added 2, 32″ tall, white glitter branches in the back. These came from Joanns. I only paid $2 for each branch. It was too good of a deal to pass up! It really came together when I took a cheap, silver, Mardi Gras styled necklace, also from DT, cut it in half and draped it around the branches as a garland. I took some of the cool white lights that I had framing the mirror and carefully tucked them into the vase. I placed it in a way where it has a reflection in the mirror so it really lit up and shined.

Use Greenery or Real Plants

Our total is now at $15. I have a large spider plant on the far side of the mantle, permanently. This is because my little one likes to try and grab the leaves and pull it down. I added an old Christmas tree and Santa Claus knick knack and some red and silver ornaments, also from DT, along the length of the mantle. This is how I was able to meet halfway with the villain. I didn’t use any tacky, old fashioned, red and green decorations, but it still had the appearance of a traditional red and green vignette. I used greenery/plants! I was able to have my silver, glitter, winter theme, while he had his red and green. That’s all for the mantle, $15!

20171223_181244

Spread Items Throughout the House

I strategically hung silver ornaments in our large living room window, using different lengths of 1/8″ wide white ribbon. I placed a $2 strand of pine garland along the top of the curtain rod. Be sure to really fluff up any pine garland that you purchase. It’s an easy way to make it look real and full vs cheap and blah. I also added more of those branches from the tree along my driveway to fill out my garland and our very old, hand me down, tree. I of course took advantage of the after Christmas sales this year and bought us a larger, better quality tree, some smaller items, and the biggest necessity when you have a damp basement and a scary attic; totes! Now everything is nicely organized for next year. I used smaller vignettes throughout the house so it just felt like Christmas. The kitchen had a red, embroidered tablecloth with a really pretty white and metallic place mat in the center back. I found an LED light kit at my local Big Lots for $7 and set that up on the table with some fresh poinsettias, that I scored for free. I stopped at the grocery store downtown, just a few minutes before they closed on Christmas eve. I didn’t really need anything, but I know that they give away the remaining fresh holiday florals every year. So check out yours on Christmas eve and just ask! Most likely they will hand you a pot and say “Merry Christmas”.  The LED candle kit came with two tealight candles, a red and a green votive with clear designs to let the light come through, and one tall candle with a candle wreath. I used empty candle jars that are now perfect Apothecary jars, to put the votives and tealights in. I added some Buffalo Snow, my favorite faux snow, inside and a few tiny cinnamon scented pinecones. Those also came from Big Lots, on sale. A pretty dishcloth hanging from the hook by the kitchen and bathroom sinks, and one hanging off the oven handle. I bought an 18″ white tree for my daughter’s room from DT and wrapped miniature tinsel around it, blue fairy lights (Joanns, already owned), and another Mardi Gras styled necklace. I actually have some buyer’s remorse with that tree. I regret not getting more in green! They would look amazing on a mantle, side/console/kitchen/coffee table, beside your tree, etc. They are actually a really great buy, so I’m hoping to get more next year!

Check out my FB Page

So, for my first year actually decorating as an adult/mom, I think I did pretty well. I had to buy decorations, but I reused a lot of different items in various ways. All in all, I believe I spent less than $30 to add holiday cheer throughout my entire home. Plus, the villain was pleased with the turnout and my daughter was mesmerized. I’m already looking forward to next year and using more of the items I made for my FB business in my own home. That’s all I have for you today. If you have any other tips you’d like to share, please do in the comment section!